Lenticular printing is what makes images appear to change or “flip” as you move—but what’s actually happening beneath the surface is far more precise than it looks. At a glance, it seems almost like a trick of the eye. In reality, it’s a carefully controlled interaction between light, lenses, and a specially prepared image. In this guide, we’ll break down how that process works, starting with the core components and focusing on how a single lenticule directs light to create the flip effect.
In this blog post, we’ll look at the basic components of a lenticular flip image, with a particular focus on how light is refracted through a lenticular sheet to create the flip effect.

A lenticular flip image relies on three key components:
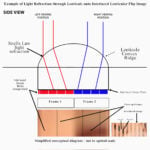
Lenticules are tiny convex lenses arranged in rows across the surface of the sheet. Each lenticule directs incoming light to specific parts of the image below through refraction (described by Snell’s Law).
The lenticular sheet is a transparent plastic material—most commonly made from PETG—that contains the lenticules. The front surface is formed by the lens structure, while the back surface is flat and used for the image.
The interlaced image is printed on or attached to the back of the lenticular sheet. It consists of narrow vertical strips from two (or more) images, arranged so that different parts of the image become visible from different viewing angles.
A flip lenticular image is created by combining two separate pictures—Frame 1 and Frame 2—into a single interlaced image.
Instead of placing the images side by side, they are sliced into narrow vertical strips and arranged beneath each lenticule. Each lenticule then directs light to different parts of this interlaced image depending on the viewing angle.
Because of this, the viewer only sees one image at a time.
The flip effect occurs because each lenticule continuously redirects light based on your viewing position.
As you move from left to right:
At a certain point, the visible image switches from Frame 1 to Frame 2. This transition can appear sharp or slightly blended depending on the image design and alignment.
Although we often simplify this into two regions (Frame 1 and Frame 2), the actual image beneath each lenticule is made up of multiple pixel-wide strips.
For a simple 2-flip image, the structure under one lenticule looks like this:
This layout allows the lenticule to map viewing angles smoothly across its width, ensuring the correct image is seen from each side.
For the effect to work properly, the interlaced image must be precisely aligned with the lenticular sheet.
If the alignment is off:
This is why accurate calculations—such as lens pitch and print resolution—are critical when creating lenticular prints.
A flip lenticular image works by using a lenticule to control which parts of an interlaced image are visible from different angles. By slicing two images into narrow strips and placing them under a lenticular sheet, each lenticule directs light so that only one image is seen at a time.
As the viewer moves, the visible image changes—creating the flip effect.